<?xml version="1.0" encoding="utf-8"?><feed xmlns="http://www.w3.org/2005/Atom" ><generator uri="https://jekyllrb.com/" version="3.10.0">Jekyll</generator><link href="https://flymetothecloud.com/feed.xml" rel="self" type="application/atom+xml" /><link href="https://flymetothecloud.com/" rel="alternate" type="text/html" /><updated>2026-07-28T10:27:46+00:00</updated><id>https://flymetothecloud.com/feed.xml</id><title type="html">Flymetothecloud.com</title><subtitle>Cloud, Azure, and infrastructure notes by Dimitris Pantazis.</subtitle><author><name>Dimitris Pantazis</name></author><entry><title type="html">How to Manage Your Azure Terraform Modules</title><link href="https://flymetothecloud.com/2025/02/04/how-to-manage-your-azure-terraform-modules/" rel="alternate" type="text/html" title="How to Manage Your Azure Terraform Modules" /><published>2025-02-04T21:14:00+00:00</published><updated>2025-02-04T21:14:00+00:00</updated><id>https://flymetothecloud.com/2025/02/04/how-to-manage-your-azure-terraform-modules</id><content type="html" xml:base="https://flymetothecloud.com/2025/02/04/how-to-manage-your-azure-terraform-modules/"><![CDATA[<p>As cloud infrastructure grows more complex, managing your Terraform modules effectively is crucial to ensuring your Azure environment remains scalable, secure, and maintainable. Terraform's modular structure allows you to create reusable pieces of infrastructure code, but managing these modules at scale requires strategy and best practices. Here’s a guide to help you manage your Azure Terraform modules efficiently.</p>

<p><strong>Organize Your Modules</strong></p>

<p>Separating modules by resource type is a good option. Break down your infrastructure into logical components e.g. networking, compute and storage. Always make use of a standard directory structure that might look like this:</p>

<ol class="wp-block-list">
<li></li>
</ol>

<pre class="wp-block-code has-ast-global-color-4-background-color has-background"><code><code>/modules
  /networking
  /compute
  /storage
/environments
  /dev
  /staging
  /prod</code></code></pre>

<p>You should also consider using Git repositories to store and version your modules. For complex environments, consider maintaining a separate repository for shared modules.</p>

<p><strong>Adopt Versioning Practices</strong></p>

<ol start="2" class="wp-block-list">
<li></li>
</ol>

<p>Tag your module versions using Semantic Versioning (e.g., v1.0.0) and use these tags in your Terraform configuration.  It is always important to lock module versions, specifying a version for each module in your terraform configuration. These two techniques will help in rolling out updates safely and ensuring optimal deployment with no breaking changes.</p>

<pre class="wp-block-code has-ast-global-color-4-background-color has-background"><code><code><code>module "networking" {
  source = "git::https://github.com/example/networking.git?ref=v1.2.0"
}</code></code></code></pre>

<p><strong>Use Remote State Management</strong></p>

<ol start="3" class="wp-block-list">
<li></li>
</ol>

<p>Store your Terraform state files in Azure Storage Accounts or another remote backend to ensure consistency and enable team collaboration and configure state locking to prevent concurrent modifications. Terraform state will become a critical component of your infrastructure. Without it, you will not be able to perform infrastructure deployments. Always implement resiliency for your Storage Accounts that hold your Terraform state such as Geo-Redundancy, soft-delete for blobs / containers as well as Azure resource locks.</p>

<pre class="wp-block-code has-ast-global-color-4-background-color has-background"><code>terraform {
  backend "azurerm" {
    resource_group_name = "tfstate-rg"
    storage_account_name = "tfstate"
    container_name = "state"
    key = "terraform.tfstate"
  }
}</code></pre>

<p><strong>Enforce Standards with Module Registry</strong></p>

<ol start="4" class="wp-block-list">
<li></li>
</ol>

<p>Use a private Terraform module registry (like Terraform Cloud or an internal solution) to centralize your modules and establish naming conventions and documentation standards for modules to maintain clarity.</p>

<p><strong>Implement CI/CD for Modules</strong></p>

<ol start="5" class="wp-block-list">
<li></li>
</ol>

<p>Automate testing and validation of modules using CI/CD pipelines. There are several tools available like <a href="https://terratest.gruntwork.io/">terratest </a>or <a href="https://www.checkov.io/">checkov </a>for validating your infrastructure code. In your CI pipeline make sure to include the following steps:</p>

<ul class="wp-block-list">
<li>Lint and format your code.</li>

<li>Run unit tests and static analysis.</li>

<li>Deploy to a test environment and validate outputs.</li>
</ul>

<p><strong>Document Your Modules</strong></p>

<ol start="6" class="wp-block-list">
<li></li>
</ol>

<p>Create README.md files for each module with clear usage instructions, input/output variables, and examples. Use the following example as template for your module documentation:</p>

<pre class="wp-block-code has-ast-global-color-4-background-color has-background"><code># Networking Module
## Usage
```hcl
module "networking" {
  source = "git::https://github.com/example/networking.git"
  vnet_name = "my-vnet"
  subnet_count = 2
}</code></pre>

<p class="has-ast-global-color-4-background-color has-background"><strong>Inputs</strong><br />vnet_name: (string) Name of the Virtual Network<br />subnet_count: (int) Number of subnets to create<br /><strong>Outputs</strong><br />subnet_ids: List of subnet IDs</p>

<p><strong>Monitor and Review</strong></p>

<ol start="7" class="wp-block-list">
<li></li>
</ol>

<p>Regularly review and update modules to incorporate best practices, security updates, and new Azure features. Use tools like Azure Policy to ensure deployed resources comply with your organization's governance policies.</p>

<p><strong>Foster Collaboration</strong></p>

<ol start="8" class="wp-block-list">
<li></li>
</ol>

<p>Encourage team contributions to module repositories and always use pull requests and code reviews to maintain quality and consistency.</p>

<p>By following these practices, you can streamline the management of your Azure Terraform modules, reduce technical debt, and empower your team to deliver robust infrastructure as code. Start small, iterate, and adapt these tips to fit your organization's unique needs.</p>

<pre class="wp-block-code has-ast-global-color-4-background-color has-background"><code></code></pre>]]></content><author><name>Dimitris Pantazis</name></author><category term="Uncategorized" /><summary type="html"><![CDATA[As cloud infrastructure grows more complex, managing your Terraform modules effectively is crucial to ensuring your Azure environment remains scalable, secure, and maintainable. Terraform's modular structure allows you to create reusable pieces of infrastructure code, but managing these modules at scale requires strategy and best practices. Here’s a guide to help you manage your Azure Terraform modules efficiently.]]></summary></entry><entry><title type="html">Uploading files to Azure VMs using Azure Bastion</title><link href="https://flymetothecloud.com/2023/11/12/uploading-files-to-azure-vms-using-azure-bastion/" rel="alternate" type="text/html" title="Uploading files to Azure VMs using Azure Bastion" /><published>2023-11-12T12:17:11+00:00</published><updated>2023-11-12T12:17:11+00:00</updated><id>https://flymetothecloud.com/2023/11/12/uploading-files-to-azure-vms-using-azure-bastion</id><content type="html" xml:base="https://flymetothecloud.com/2023/11/12/uploading-files-to-azure-vms-using-azure-bastion/"><![CDATA[<p>Hello there!</p>

<p>Recently, I was working on an Azure project and one of my tasks involved a step where I had to upload some files to a Linux virtual machine. However, the environment was locked down and I did not have direct SSH access to the VM. The only option for remote access was this cool service called "Azure Bastion". You probably already know what it does but in case you don't, you can<a href="https://azure.microsoft.com/en-us/products/azure-bastion"> read more about this fully managed RDP/SSH solution</a>.</p>

<p>So, during my research what would be the quickest approach to perform this upload, I first thought that I could upload the file to a remote cloud storage e.g. OneDrive or even an Azure Storage Account. But, I didn't want to involve more services and at some point <a href="https://azure.microsoft.com/en-us/updates/azure-bastion-file-transfer-native-client/">this post </a>flashed into my mind which says that Azure Bastion supports file uploads with its "Native Client Support" feature. </p>

<p>I though "Great, I already use Bastion!" What about the prerequisites? Easy stuff:</p>

<ul>
<li>Azure CLI &gt;= 2.32</li>

<li>The VM resource ID</li>
</ul>

<p>Keep reading to find out how you can try this by yourself.</p>

<p>What you will need is of course a Bastion, a Linux VM and some Virtual Networks. If you have none of these, go to Azure Quickstart Templates and deploy <a href="https://learn.microsoft.com/en-us/samples/azure/azure-quickstart-templates/bastion-hub-spoke-vnet/">this template</a> by clicking on "Deploy to Azure". Sign in to your Azure Subscription and fill in the template parameters. You will need to define at least the Resource Group along with a username and a password for your VM. Once completed, you should have a Resource Group with the following resources:</p>

<ul>
<li>A hub vnet</li>

<li>A spoke vnet</li>

<li>A bastion host on the Basic tier (you will later need to upgrade to Standard) </li>

<li>A public IP address</li>

<li>A Linux VM with its disk and network interface</li>
</ul>

<p>For the file upload feature to work, your Bastion host must be on the Standard tier and the "Native Client Support" option must be enabled. To do this on the Azure Portal, navigate to your Bastion host resource and under "Settings" select the "Configuration" option. In this page, ensure that the "Standard" tier is selected and the "Native Client Support" box is checked. </p>

<figure class="wp-block-image size-large"><img src="/wp-content/uploads/2023/11/image-1024x674.png" alt="" class="wp-image-247" /></figure>

<p>Click "Apply" to deploy any changes that you made.</p>

<p>Open a Terminal window and run the following commands replacing &lt;subscription id&gt; by the ID of the subscription that contains the Bastion host (not the VM):</p>

<pre class="wp-block-code"><code>az login
az account set -s &lt;subscription id&gt;</code></pre>

<p>Run the following command to create a tunnel between your PC and the VM over the Bastion host, providing the right parameter values for your environment:</p>

<pre class="wp-block-code"><code>az network bastion tunnel --name &lt;bastion name&gt; --resource-group &lt;resource group name&gt; --target-resource-id &lt;VM resourceId&gt; --resource-port &lt;target VM port&gt; --port &lt;local machine port&gt;</code></pre>

<ul>
<li><em>bastion name:</em> the name of your Bastion host</li>

<li><em>resource Group name:</em>  the name of the resource group that contains your Bastion host</li>

<li><em>VM resourceId:</em> you can find it in the properties section of your VM in the Azure Portal</li>

<li><em>Target VM port:</em>  it is the port where SSH runs on the targer VM, typically 22.</li>

<li><em>Local machine port:</em> choose a non-reserved TCP port on your PC. You will use it later for the file transfer.</li>
</ul>

<p><strong>Tip:</strong> In case you receive a message that the bastion host was not found, make sure that you are targeting the right Azure Subscription in your Azure CLI session. More specifically, if you are on an environment that uses Azure Landing Zones, most probably your bastion host is deployed in the "Connectivity" subscription but your VM is on an Application Landing Zone. Furthermore, to use the Bastion host, you need to have the "Reader" role on the Bastion host as well as the Virtual Network where it lives.</p>

<p>Once the tunnel is successfully created you will see the message below: </p>

<pre class="wp-block-code"><code>Opening tunnel on port: 59999
Tunnel is ready, connect on port 59999
Ctrl + C to close</code></pre>

<p>Now you can perform the file upload using your favourite SFTP/SCP client. I use WinSCP. To connect to your VM use the following host details:</p>

<p>Host: localhost<br />Port: The local machine port that you provided earlier in the 'az network bastion tunnel' command<br />Username: The VM username<br />Password: The VM password</p>

<figure class="wp-block-image size-full"><img src="/wp-content/uploads/2023/11/image-1.png" alt="" class="wp-image-250" /></figure>

<p>All set! Now you are ready to perform the file upload:</p>

<figure class="wp-block-image size-large"><img src="/wp-content/uploads/2023/11/image-2-1024x291.png" alt="" class="wp-image-251" /></figure>]]></content><author><name>Dimitris Pantazis</name></author><category term="Uncategorized" /><category term="azure" /><category term="bastion" /><category term="file transfer" /><category term="landing zones" /><category term="network" /><category term="ssh" /><summary type="html"><![CDATA[Hello there!]]></summary><media:thumbnail xmlns:media="http://search.yahoo.com/mrss/" url="https://flymetothecloud.com/wp-content/uploads/2023/11/Untitled.png" /><media:content medium="image" url="https://flymetothecloud.com/wp-content/uploads/2023/11/Untitled.png" xmlns:media="http://search.yahoo.com/mrss/" /></entry><entry><title type="html">Start your Azure Landing Zones journey with Terraform</title><link href="https://flymetothecloud.com/2022/10/12/start-your-azure-landing-zones-journey-with-terraform/" rel="alternate" type="text/html" title="Start your Azure Landing Zones journey with Terraform" /><published>2022-10-12T11:45:47+00:00</published><updated>2022-10-12T11:45:47+00:00</updated><id>https://flymetothecloud.com/2022/10/12/start-your-azure-landing-zones-journey-with-terraform</id><content type="html" xml:base="https://flymetothecloud.com/2022/10/12/start-your-azure-landing-zones-journey-with-terraform/"><![CDATA[<p>Managing an Azure environment can require a lot of effort, especially for large enterprises. Microsoft has released its own guidelines and recommendations around this topic in the <a rel="noreferrer noopener" aria-label="Azure Landing Zones conceptual architecture (opens in a new tab)" href="https://learn.microsoft.com/en-us/azure/cloud-adoption-framework/ready/landing-zone/#azure-landing-zone-conceptual-architecture" target="_blank">Azure Landing Zones conceptual architecture</a>, part of the Cloud Adoption Framework. It provides an opinionated approach on deploying and managing the foundations of an organization's Azure estate, based on all the lessons learned by Microsoft and its partners after all these years of experience.</p>

<p>The good news is that you can easily benefit from this and start applying all these best practices on your own Azure environment today! Microsoft provides the following three implementation options for Azure Landing Zones:</p>

<ul><li>Portal Accelerator (GUI-driven)</li><li>Bicep module (automation-friendly)</li><li>Terraform module (automation-friendly)</li></ul>

<p>As you might have guessed, this blog and its author love automation, therefore we will not focus on bullet #1 (although you can read about it at the <a rel="noreferrer noopener" aria-label="Deploy Enterprise-Scale foundation page on GitHub (opens in a new tab)" href="https://github.com/Azure/Enterprise-Scale/blob/main/docs/reference/wingtip/README.md" target="_blank">Deploy Enterprise-Scale foundation page on GitHub</a>). So, we are left with options #2 and #3. For this post we will work with the Terraform option.</p>

<p>Before we dig deeper, let's make sure that you are familiar with the concepts of Terraform. Terraform is one of the most popular Infrastructure-as-Code languages, that can help you deploy and configure your infrastructure using declarative code syntax. It can work with all major public cloud providers as well as many on-premises platforms. There is <a rel="noreferrer noopener" aria-label="a nice tutorial at Hashicorp Learn (opens in a new tab)" href="https://learn.hashicorp.com/collections/terraform/azure-get-started" target="_blank">a nice tutorial at Hashicorp Learn</a> that can teach you all the basics for Terraform on Azure in less than an hour. </p>

<p>Back to our main topic, Microsoft provides the <a href="https://github.com/Azure/terraform-azurerm-caf-enterprise-scale" target="_blank" rel="noreferrer noopener" aria-label="Azure Landing Zones Enterprise Scale Terraform module (opens in a new tab)">Azure Landing Zones Enterprise Scale Terraform module</a>, which can help us quickly deploy the foundations of our Azure environment, such as management groups, policies, role assignments, networking, logging and security. To start, make sure that your workstation has all the necessary tools installed such as:</p>

<ul><li>Your favorite editor (e.g. <a rel="noreferrer noopener" aria-label="VSCode (opens in a new tab)" href="https://code.visualstudio.com/download" target="_blank">VSCode</a>)</li><li><a rel="noreferrer noopener" aria-label="Azure CLI (opens in a new tab)" href="https://learn.microsoft.com/en-us/cli/azure/install-azure-cli" target="_blank">Azure CLI</a></li><li><a href="https://learn.hashicorp.com/tutorials/terraform/install-cli" target="_blank" rel="noreferrer noopener" aria-label="Terraform (opens in a new tab)">Terraform</a> </li></ul>

<p>Launch VSCode and create a new folder e.g. "ALZ". Next, create a new file "main.tf." and type the following code:</p>

<pre class="wp-block-code"><code>terraform {
  required_providers {
    azurerm = {
      source  = "hashicorp/azurerm"
      version = "&gt;= 3.0.2"
    }
  }
}

<p>provider "azurerm" {<br />
  features {}<br />
}</p>

<p>data "azurerm_client_config" "core" {}</p>

<p>module "enterprise_scale" {<br />
  source  = "Azure/caf-enterprise-scale/azurerm"<br />
  version = "2.4.1"</p>

<p>providers = {<br />
    azurerm              = azurerm<br />
    azurerm.connectivity = azurerm<br />
    azurerm.management   = azurerm<br />
  }</p>

<p>root_parent_id = data.azurerm_client_config.core.tenant_id<br />
  root_id        = ""<br />
  root_name      = ""</p>

<p>}&lt;/code&gt;&lt;/pre&gt;</p>

<p>Make sure to give root_id and root_name values that are suitable to your organization. For example, if you work for the "FlyMeToTheCloud" company, you can set it to something like:</p>

<pre class="wp-block-code"><code>  root_id        = "Fly"
  root_name      = "FlyMeToTheCloud"</code></pre>

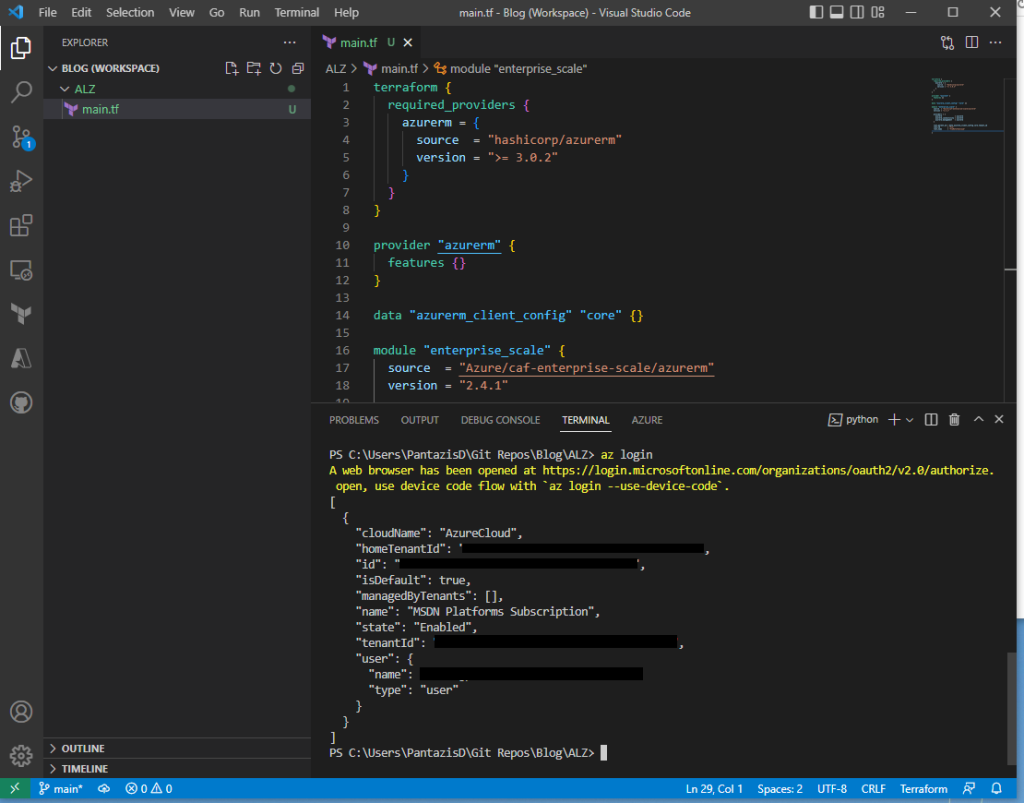
<p>On VSCode open a terminal and make sure that you cd to the directory that contains your main.tf file. Then, type "az login" to connect to your Azure tenant.</p>

<figure class="wp-block-image"><img src="/wp-content/uploads/2022/10/Screenshot-2022-10-10-162951-1-1024x803.png" alt="" class="wp-image-226" /></figure>

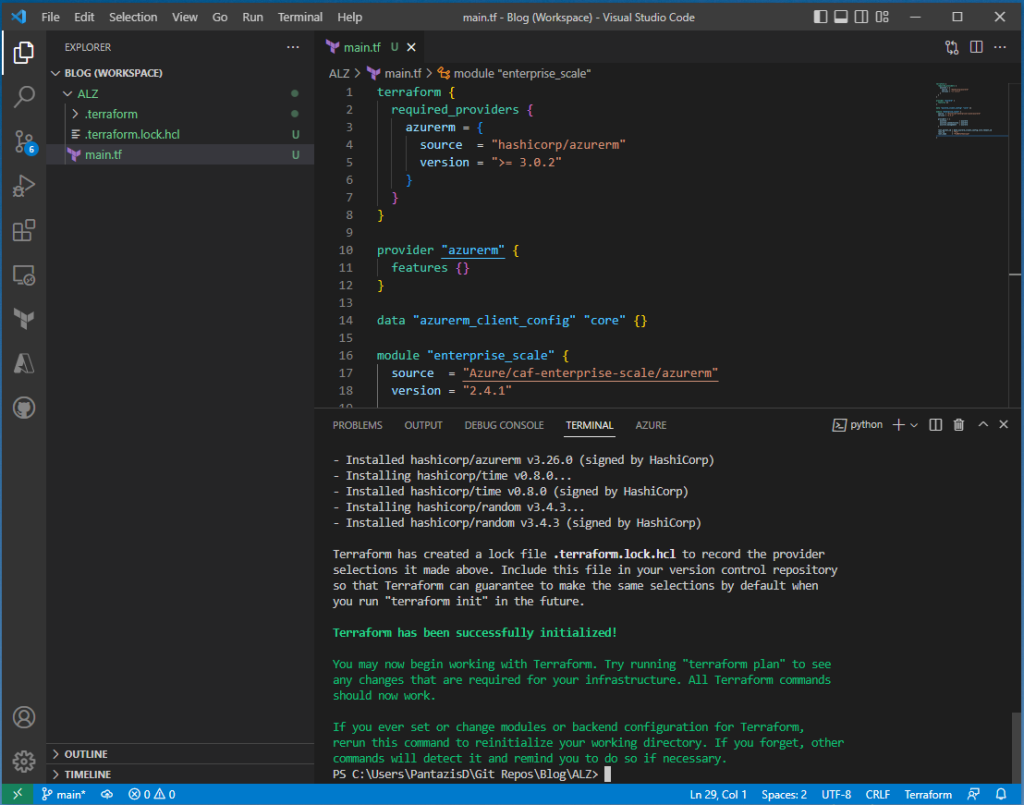
<p>Now, run "terraform init" to initialize Terraform for the new configuration.</p>

<figure class="wp-block-image"><img src="/wp-content/uploads/2022/10/Screenshot-2022-10-10-163510-1024x805.png" alt="" class="wp-image-227" /></figure>

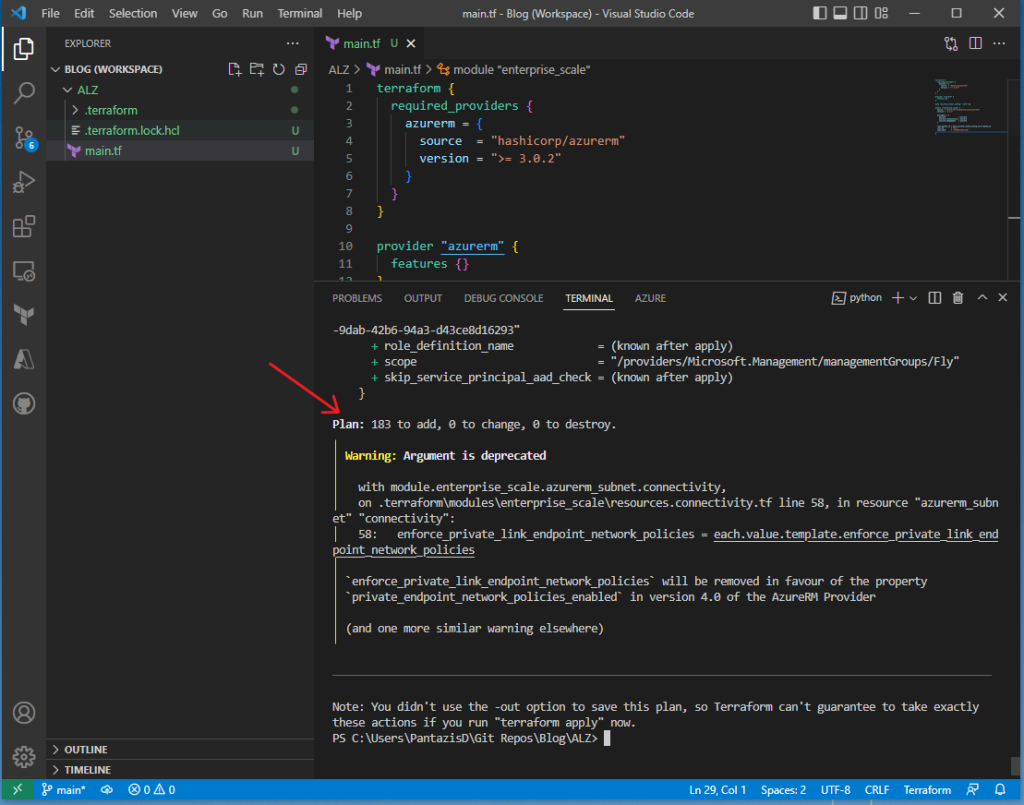
<p>Next, run "terraform plan" to preview the changes that the new configuration would apply to Azure. Take a look to the output of this command. In this case, 183 new resources will be created in Azure. This is expected. You can scroll up in the terminal window to review the detailed list of what will be deployed.</p>

<figure class="wp-block-image"><img src="/wp-content/uploads/2022/10/Screenshot-2022-10-10-163640-1024x805.png" alt="" class="wp-image-228" /></figure>

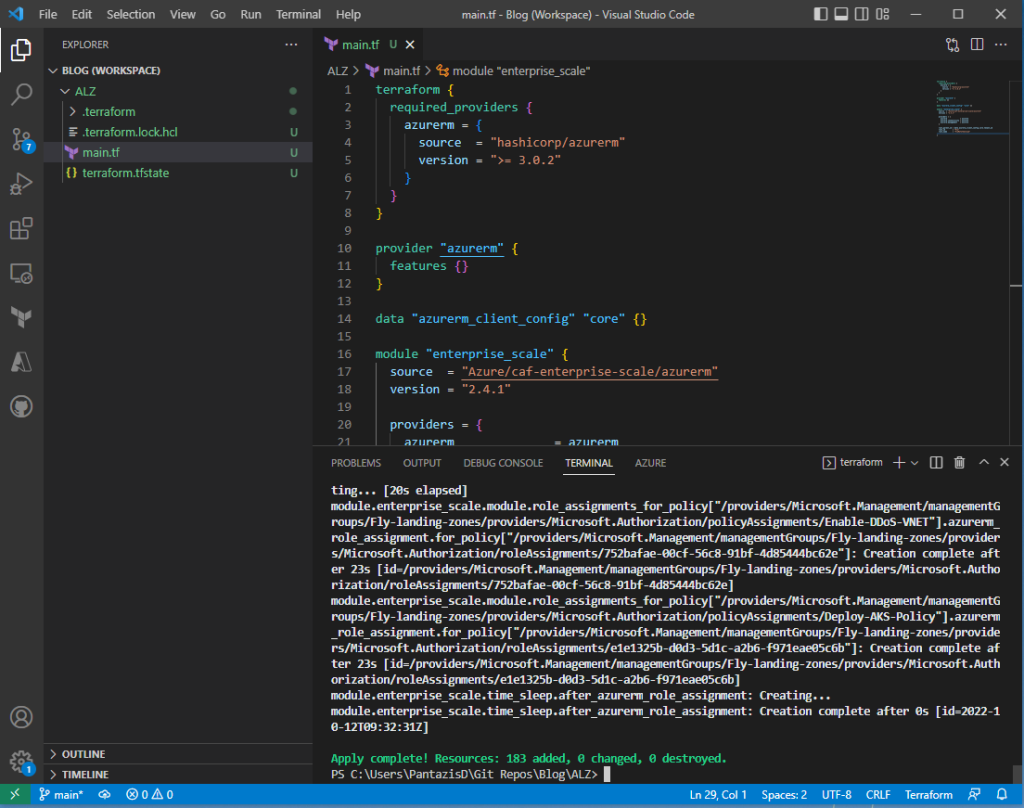
<p>Finally, run "terraform apply" to deploy the changes to Azure. When asked, type yes to approve the planned changes. Once completed, review the number of resources that have been deployed to Azure.</p>

<figure class="wp-block-image"><img src="/wp-content/uploads/2022/10/Screenshot-2022-10-12-125156-1024x808.png" alt="" class="wp-image-232" /></figure>

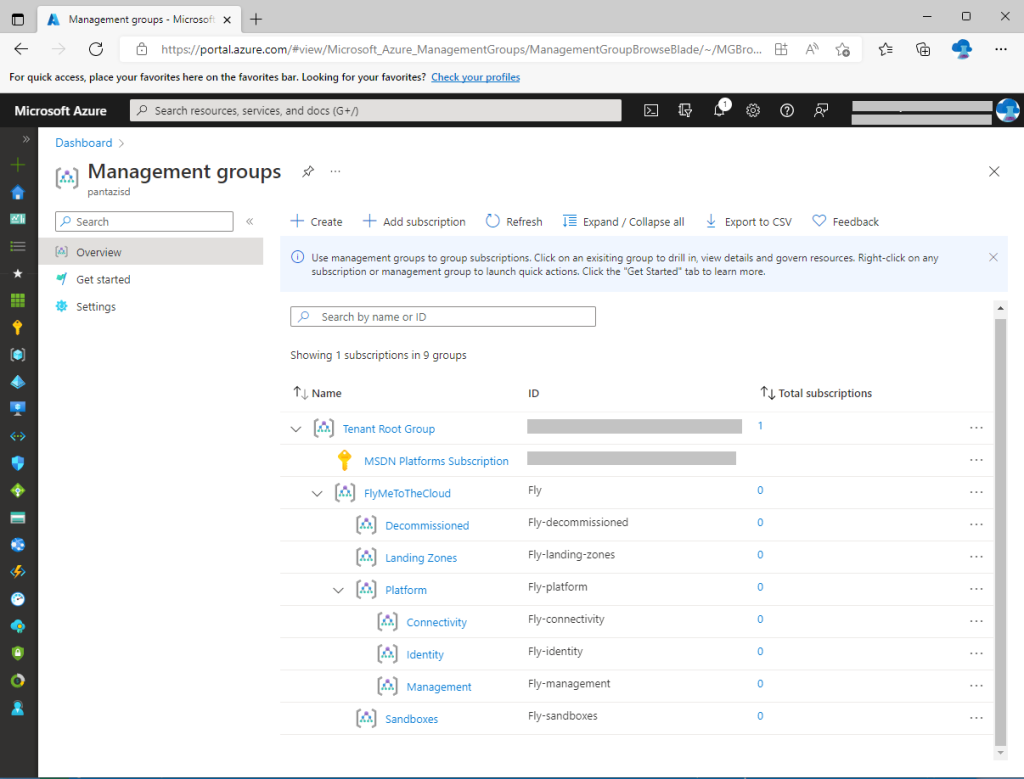
<p>Navigate to the Azure Portal and review the applied changes. For example, open the Management Groups page and review the new management groups. Note that there is a new MG called "FlyMeToTheCloud" with the ID "Fly". This is the "Intermediate Root" MG.</p>

<figure class="wp-block-image"><img src="/wp-content/uploads/2022/10/Screenshot-2022-10-12-130200-1024x779.png" alt="" class="wp-image-233" /></figure>

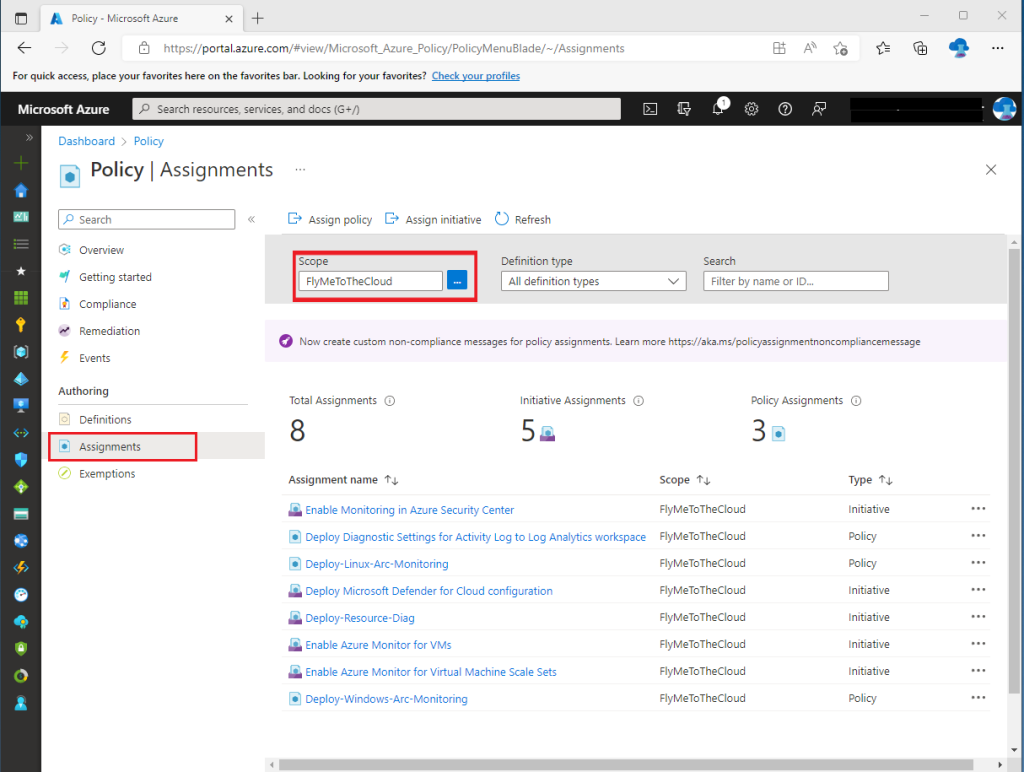
<p>You can also review the policy assignments created by our deployment. On the Azure Portal, navigate to "Policy", click "Assignments" and set the "Scope" to the Intermediate Root MG which in our case is "FlyMeToTheCloud". You can have a look at all the actual policies assigned at the <a href="https://github.com/Azure/Enterprise-Scale/blob/main/docs/ESLZ-Policies.md">dedicated page on GitHub</a>.</p>

<figure class="wp-block-image"><img src="/wp-content/uploads/2022/10/Screenshot-2022-10-12-131530-1024x772.png" alt="" class="wp-image-234" /></figure>

<p>The above changes should not produce any charges to your Azure subscriptions. After all, we just created some management groups and applied a few policies, which are all provided for free. Furthermore, these should not impact any resources (e.g. Virtual Machines) that you might have already created, since we did not move any subscriptions under these MGs. We will discuss this point in a future post.</p>
</code></pre>]]></content><author><name>Dimitris Pantazis</name></author><category term="Uncategorized" /><category term="automation" /><category term="azure" /><category term="iac" /><category term="landing zones" /><category term="terraform" /><summary type="html"><![CDATA[Managing an Azure environment can require a lot of effort, especially for large enterprises. Microsoft has released its own guidelines and recommendations around this topic in the Azure Landing Zones conceptual architecture, part of the Cloud Adoption Framework. It provides an opinionated approach on deploying and managing the foundations of an organization's Azure estate, based on all the lessons learned by Microsoft and its partners after all these years of experience.]]></summary><media:thumbnail xmlns:media="http://search.yahoo.com/mrss/" url="https://flymetothecloud.com/wp-content/uploads/2022/10/Screenshot-2022-10-12-143427.png" /><media:content medium="image" url="https://flymetothecloud.com/wp-content/uploads/2022/10/Screenshot-2022-10-12-143427.png" xmlns:media="http://search.yahoo.com/mrss/" /></entry><entry><title type="html">Connect to Azure Key Vault using managed identities</title><link href="https://flymetothecloud.com/2020/10/17/connect-to-azure-key-vault-using-managed-identities/" rel="alternate" type="text/html" title="Connect to Azure Key Vault using managed identities" /><published>2020-10-17T20:50:07+00:00</published><updated>2020-10-17T20:50:07+00:00</updated><id>https://flymetothecloud.com/2020/10/17/connect-to-azure-key-vault-using-managed-identities</id><content type="html" xml:base="https://flymetothecloud.com/2020/10/17/connect-to-azure-key-vault-using-managed-identities/"><![CDATA[<p>Hello!</p>

<p>How many times have you tried to write a script that needs to open a connection to a remote machine such as a SFTP server? Most probably this machine will ask you to authenticate before uploading any files. In order to perform authentication, you would need to provide the username and password for the connection to be established. Normally, you would have to store these credentials somewhere on the disk. If you were smart enough to avoid storing such sensitive information in plain text, you would use the "ConvertTo-SecureString" cmdlet in order to encrypt the password. In most cases, only the user who encrypted the password could decrypt it. </p>

<p>If you are looking for a way to avoid storing these credentials on your machine, let me introduce you to Azure Key Vault. It's a service that can help you store your keys, secrets and certificates in a secure manner, either using Microsoft-managed keys or customer-managed keys backed by a Hardware Security Module (HSM). That said, you could safely store your script passwords into Azure and retrieve them temporarily during runtime, as long as the script execution lasts.</p>

<p>As you may expect, Azure Key Vault implements Role Based Access Control policies in order to granularly define who can access it and which secrets they can retrieve. You might wonder, why should I use a Key Vault if I need to authenticate against it, using stored credentials? Well, the solution to that is provided by his majesty, Azure Active Directory and its System Assigned Managed Identity feature. This way, your Azure VM can connect to Azure Key Vault without having to store any credentials on the disk or the script code. Let me show you how that works.</p>

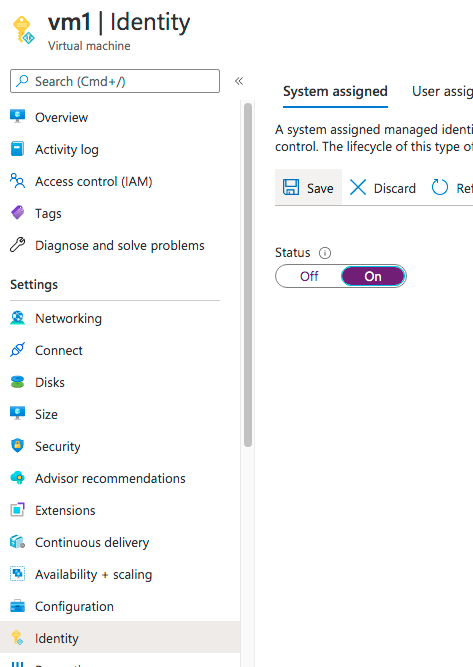
<p>First, go to the Azure portal, look for your Virtual Machine where your script runs and go the "Identity blade". In the "System Assigned" tab set "Status" to "On" and click "Save". What happens in the background is that your Azure VM receives a service principal in Azure Active Directory and you can use it in order to allow your VM to access any Azure resource that supports Azure AD authentication.</p>

<figure class="wp-block-image is-resized"><img src="/wp-content/uploads/2020/10/Screen-Shot-2020-10-17-at-09.29.32.png" alt="" class="wp-image-188" width="366" height="516" /></figure>

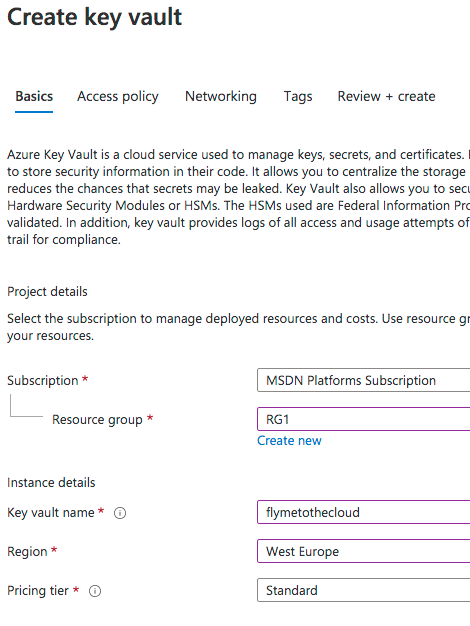
<p>Next, let's create our Azure Key vault. In Azure Portal search for "Key Vault" and then choose "Create Key Vault". In the "Create Key Vault" page we just need a few basics such as Resource Group name, Key Vault name, Region and Pricing Tier. Here we choose "Standard". We can opt-for "Premium" in case we prefer to use a Hardware Security Module (HSM) to protect our keys. Not our case, so we go with "Standard".<br />We will not examine the rest of the tabs in this article, let's go straight away to "Review + create" and then "Create".</p>

<figure class="wp-block-image"><img src="/wp-content/uploads/2020/10/Screen-Shot-2020-10-17-at-09.36.47.png" alt="" class="wp-image-189" /></figure>

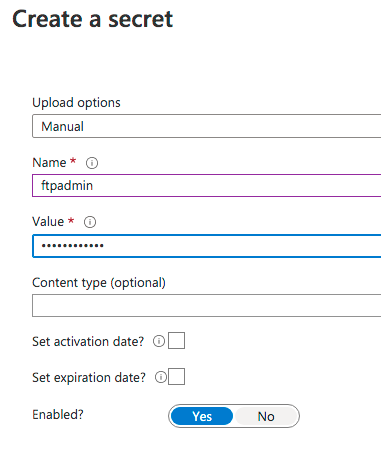
<p>Now we need to perform some configuration on our newly created Key Vault. First, we need to add the password that we are going to retrieve later. In the Azure Portal, look for your Key Vault, move to the "Secrets" blade, and choose "Generate\Import". Give a name to your secret such as "ftpadmin" (this could be your username) and type the actual password in the "Value" field. Make sure "Enabled" is set to "Yes" and click "Create".</p>

<figure class="wp-block-image"><img src="/wp-content/uploads/2020/10/Screen-Shot-2020-10-17-at-10.01.47.png" alt="" class="wp-image-190" /></figure>

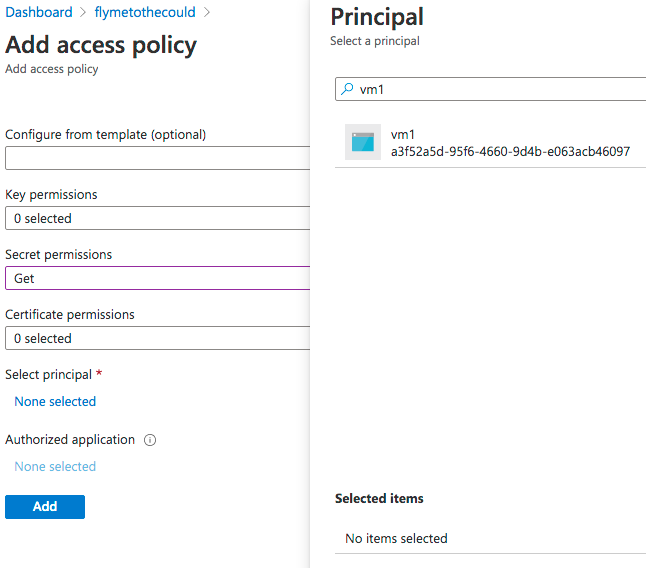
<p>Back to our Key Vault page, go to the "Access policies" blade and choose "Add access policy". Since we are going to retrieve a secret, we need to authorize our Azure VM for this action. In the "Secret permissions" menu choose at least "Get". In the "Select principal" option click on "None selected" and now type the name of your VM to find the managed identity we created earlier. Choose your VM, click "Select". Finally, click "Add".<br />Caution: Once you return to the "Access policies" blade, do not forget to click "Save"</p>

<figure class="wp-block-image"><img src="/wp-content/uploads/2020/10/Screen-Shot-2020-10-17-at-10.07.12.png" alt="" class="wp-image-191" /></figure>

<p>So now that we have prepared everything, let's take a look at the PowerShell code. What you need to do is to add a few lines to your script that will help you retrieve the secret from the Key Vault during execution. Of course, you will need to run this on the Azure VM for which you created the system-assigned managed identity a few lines above.</p>

<pre class="wp-block-preformatted">#Connect to the Azure Instance Metadata Service (IMDS)
$response = Invoke-WebRequest -Uri 'http://169.254.169.254/metadata/identity/oauth2/token?api-version=2018-02-01&amp;resource=https%3A%2F%2Fvault.azure.net' -Method GET -Headers @{Metadata="true"}

<p>#Convert the JSON formatted response to a PowerShell object <br />
$content = $response.Content | ConvertFrom-Json</p>

<p>#Store the token into a variable<br />
$KeyVaultToken = $content.access_token</p>

<p>#Connect to the Azure Key Vault passing the token in the HTTP headers <br />
((Invoke-WebRequest -Uri https://&lt;your_key_vault_URL&gt;<your_key_vault_url>/secrets/&lt;your_secret_name&gt;<your_secret_name>?api-version=2016-10-01 -Method GET -Headers @{Authorization="Bearer $KeyVaultToken"}).content | ConvertFrom-Json).value</your_secret_name></your_key_vault_url>&lt;/pre&gt;</p>

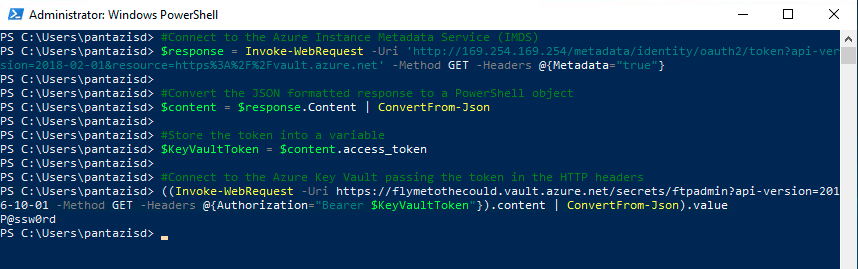
<p>What happens in the code above is that the Azure VM connects to the <a href="https://docs.microsoft.com/en-us/azure/virtual-machines/windows/instance-metadata-service">Azure Instance Metadata Service (IMDS)</a> in order to retrieve an access token. The response from IMDS is in JSON format so we need to use "ConvertFrom-Json" in order to extract the token string. Then, we make another request to our Key Vault incorporating the access token into the HTTP headers. This way, Key Vault will evaluate this token against the access policies and decide whether to allow access or not. <br />Note that in the last command you will need to fill in you Key Vault URL (available in the Key Vault's overview blade) as well as the secret name (ftpadmin in our example). </p>

<figure class="wp-block-image"><img src="/wp-content/uploads/2020/10/Screen-Shot-2020-10-17-at-23.28.08-1-1024x161.png" alt="" class="wp-image-195" /></figure>

<p>You can see the execution output in the following image. </p>

<figure class="wp-block-image"><img src="/wp-content/uploads/2020/10/Screen-Shot-2020-10-17-at-23.36.41.png" alt="" class="wp-image-196" /></figure>
</pre>]]></content><author><name>Dimitris Pantazis</name></author><category term="Azure" /><category term="Azure Active Directory" /><category term="Key Vault" /><category term="PowerShell" /><summary type="html"><![CDATA[Hello!]]></summary><media:thumbnail xmlns:media="http://search.yahoo.com/mrss/" url="https://flymetothecloud.com/wp-content/uploads/2020/10/Screen-Shot-2020-10-17-at-23.51.58-1.png" /><media:content medium="image" url="https://flymetothecloud.com/wp-content/uploads/2020/10/Screen-Shot-2020-10-17-at-23.51.58-1.png" xmlns:media="http://search.yahoo.com/mrss/" /></entry><entry><title type="html">Azure Automation State Configuration</title><link href="https://flymetothecloud.com/2020/09/03/azure-automation-state-configuration/" rel="alternate" type="text/html" title="Azure Automation State Configuration" /><published>2020-09-03T13:58:15+00:00</published><updated>2020-09-03T13:58:15+00:00</updated><id>https://flymetothecloud.com/2020/09/03/azure-automation-state-configuration</id><content type="html" xml:base="https://flymetothecloud.com/2020/09/03/azure-automation-state-configuration/"><![CDATA[<p>Hello and welcome to my new blog!</p>

<p>In my first post I decided to talk about two technologies which, when combined, can give you a lot of power managing your VMs in the cloud.</p>

<p>First one is PowerShell. Generally, I prefer to use it for my daily tasks. I have also used it a lot in my career, in order to help organizations get rid of long, boring, GUI-driven processes and replace them with code that works every time, with the same result but, most importantly, way faster.<br />Second one is Microsoft Azure. I started working with Azure about two years ago and I can say that it has opened new fields for me enabling rapid and consistent deployments, helping to stay up-to-date and take advantage of the latest and coolest technologies in the IT industry.</p>

<p>So, this one is dedicated to Azure Automation State Configuration. It is a Configuration Management tool that can help you push declarative configurations to your servers, both in the cloud and on-premises, either Windows or Linux. It is based on PowerShell Desired State Configuration (DSC) which became available with PowerShell 4.0 in Windows Server 2012 R2. PowerShell DSC works in two modes, "push" and "pull". In the "push" mode the administrator runs a command that "pushes" a configuration against one or more servers. In the "pull" mode, the administrator uploads all configurations in a central repository called the "pull server". Then, each server contacts the "pull server" on specified intervals to see if there is any new configuration for him to "pull" and apply.</p>

<p>Azure Automation State Configuration offers you a "pull-server-as-a-service", which means that you can upload your configurations to Azure, register your servers to the service and monitor their compliance status through a reporting tool. In order to set things up, you will need the following components:
</p>

<ul><li>an Azure Automation Account</li><li>some DSC code</li><li>your own servers</li></ul>

<p class="has-medium-font-size">Create an Automation Account</p>

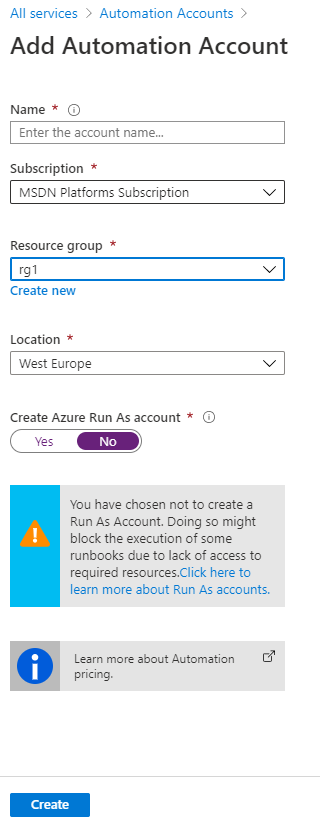
<p>Creating an Automation Account is as easy as searching for "automation" in the Azure portal. Choose "Automation Accounts" then click "Create automation account". You will need to specify a name for your automation account, a resource group and a location.</p>

<figure class="wp-block-image"><img src="/wp-content/uploads/2020/07/image.png" alt="" class="wp-image-127" /></figure>

<p>You can also create your automation account using the following Azure PowerShell cmdlet:</p>

<pre class="wp-block-code"><code>New-AzAutomationAccount -Name Automation1 -ResourceGroupName rg1 -Location westeurope</code></pre>

<p class="has-medium-font-size">Import a DSC configuration</p>

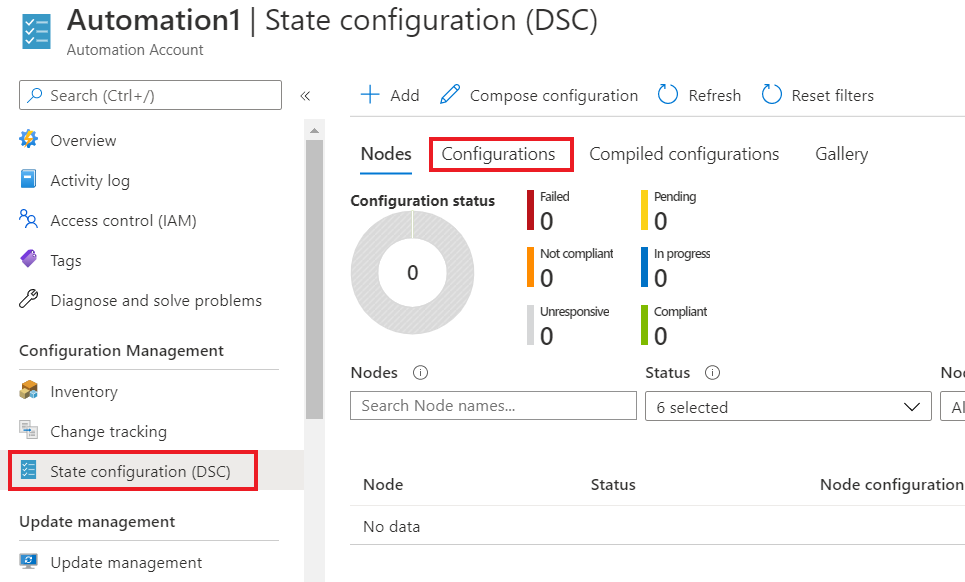
<p>Now that you have created your Automation Account, it's time to populate with some configurations, that is, the actual PowerShell code. Look for your newly created Automation Account "Automation1" and navigate to "State configuration (DSC) / Configurations" and then click "Add".</p>

<p></p>

<figure class="wp-block-image"><img src="/wp-content/uploads/2020/09/image.png" alt="" class="wp-image-130" /></figure>

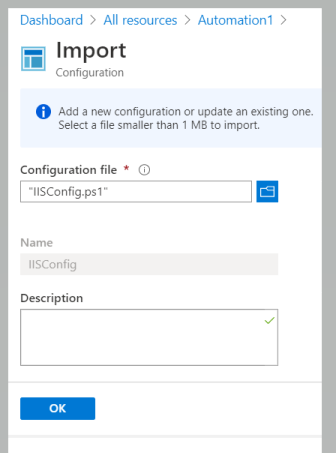
<p>Choose to upload a DSC configuration file from your hard drive and click "OK".</p>

<p></p>

<figure class="wp-block-image"><img src="/wp-content/uploads/2020/09/image-1.png" alt="" class="wp-image-133" /></figure>

<p>There are already tons of configuration files available on the Internet. You can grab a very basic one from <a href="https://github.com/dpantaz/AzureStateConfiguration/blob/master/IISConfig.ps1">my Github page</a>.</p>

<p>You can also import a configuration file using Azure PowerShell.</p>

<pre class="wp-block-code"><code>Import-AzAutomationDscConfiguration -AutomationAccountName "Automation1" -ResourceGroupName "rg1" -SourcePath ".\IISConfig.ps1" -Published</code></pre>

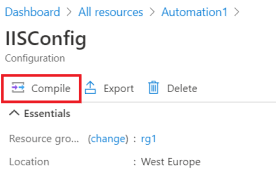
<p>Next step is to compile your configuration. Back in the Azure Portal, on the "Configurations" tab, choose your configuration and in the next window click "Compile".</p>

<figure class="wp-block-image"><img src="/wp-content/uploads/2020/09/image-3.png" alt="" class="wp-image-136" /></figure>

<p>To achieve this with Azure PowerShell just run the following cmdlet:</p>

<pre class="wp-block-code"><code>Start-AzAutomationDscCompilationJob -ConfigurationName IISConfig -ResourceGroupName rg1 -AutomationAccountName Automation1</code></pre>

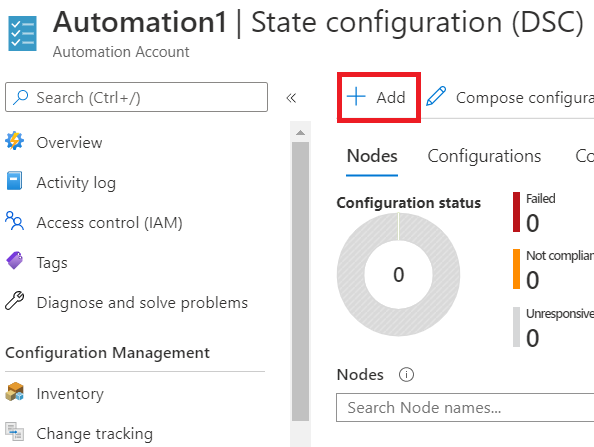
<p>Now that our code is ready, it is time to assign the configuration to our server. For this purpose I have already created an Azure VM called "vm1".<br />In the "State Configuration (DSC) blade, navigate to "Nodes" and click "Add". </p>

<figure class="wp-block-image is-resized"><img src="/wp-content/uploads/2020/09/image-4.png" alt="" class="wp-image-137" width="516" height="388" /></figure>

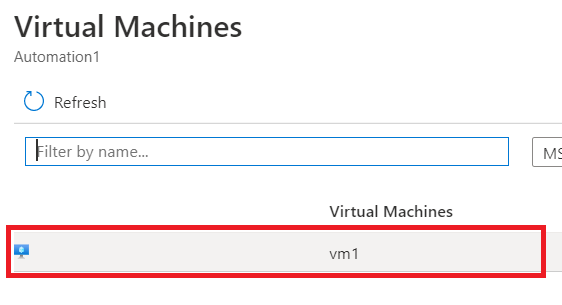
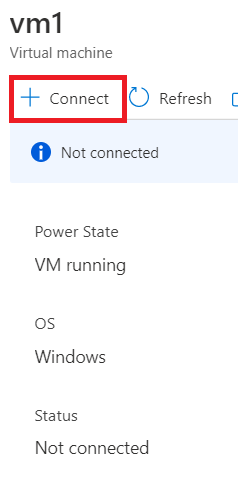
<p> Choose your VM from the list and click "Connect".<br /></p>

<figure class="wp-block-image is-resized"><img src="/wp-content/uploads/2020/09/image-5.png" alt="" class="wp-image-138" width="491" height="266" /></figure>

<figure class="wp-block-image is-resized"><img src="/wp-content/uploads/2020/09/image-7.png" alt="" class="wp-image-140" width="196" height="393" /></figure>

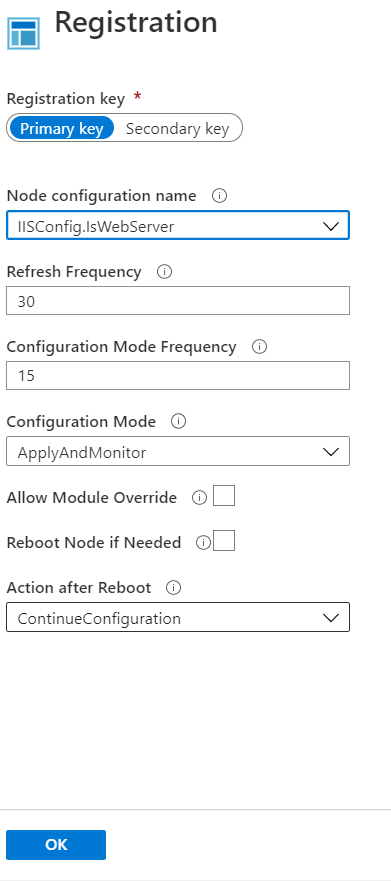
<p>In the last window, you can make a few choices such as:</p>

<ul><li><strong>Node configuration name</strong>: We will choose "IISConfig.IsWebServer" which refers to the part of our PowerShell code that installs IIS on our Windows Server.</li><li><strong>Refresh Frequency</strong>: Refers to how often the VM checks for new configurations. Default is 30 minutes.</li><li><strong>Configuration Mode</strong>: You can choose how to apply the configuration to your server. We choose "ApplyAndMonitor".</li><li><strong>Configuration Mode Frequency</strong>: It specifies how often the "Configuration Mode" is applied. Works only with " ApplyAndAutoCorrect" and "ApplyAndMonitor". Default is 15 minutes.</li></ul>

<figure class="wp-block-image is-resized"><img src="/wp-content/uploads/2020/09/image-8.png" alt="" class="wp-image-142" width="334" height="753" /></figure>

<p>Apart from using Azure Portal, you can also register your VMs as DSC nodes using the following Azure PowerShell cmdlet:</p>

<pre class="wp-block-code"><code>Register-AzAutomationDscNode -AutomationAccountName Automation1 -AzureVMName vm1 -ResourceGroupName rg1 -NodeConfigurationName "IISConfig.IsWebServer" -ConfigurationMode ApplyAndMonitor -RefreshFrequencyMins 30 -ConfigurationModeFrequencyMins 15</code></pre>

<p>Once you click OK, the "Microsoft.Powershell.DSC" extension will be installed to your VM. As soon as the registration process is completed, the configuration will be applied to your server. In our case, IIS will be installed. You can confirm that by checking IIS installation status on your VM.</p>

<figure class="wp-block-image"><img src="/wp-content/uploads/2020/09/image-9.png" alt="" class="wp-image-143" /></figure>

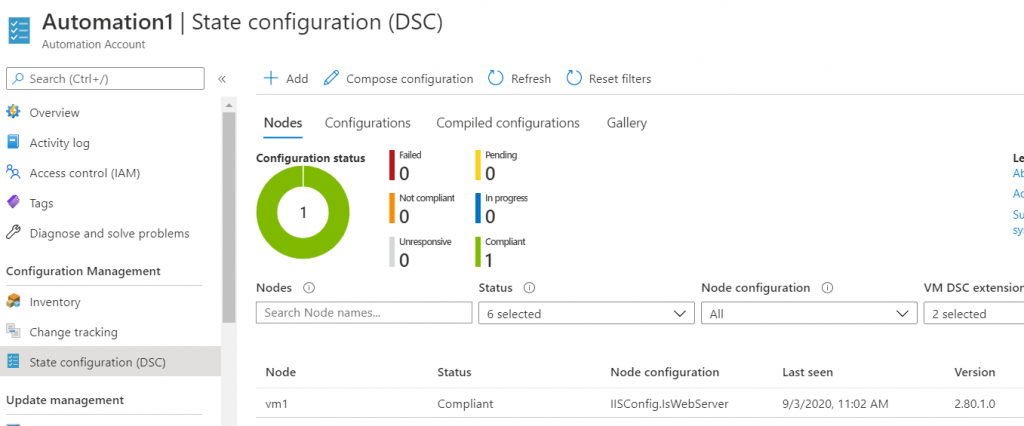
<p>You can also use Azure Portal to ensure that your nodes are compliant with the assigned configurations.</p>

<figure class="wp-block-image is-resized"><img src="/wp-content/uploads/2020/09/image-10-1024x426.png" alt="" class="wp-image-144" width="887" height="369" /></figure>

<p>As a last step, I will show you what happens if IIS gets uninstalled from the server. First, let's remove the role using Windows PowerShell</p>

<figure class="wp-block-image"><img src="/wp-content/uploads/2020/09/image-11.png" alt="" class="wp-image-146" /></figure>

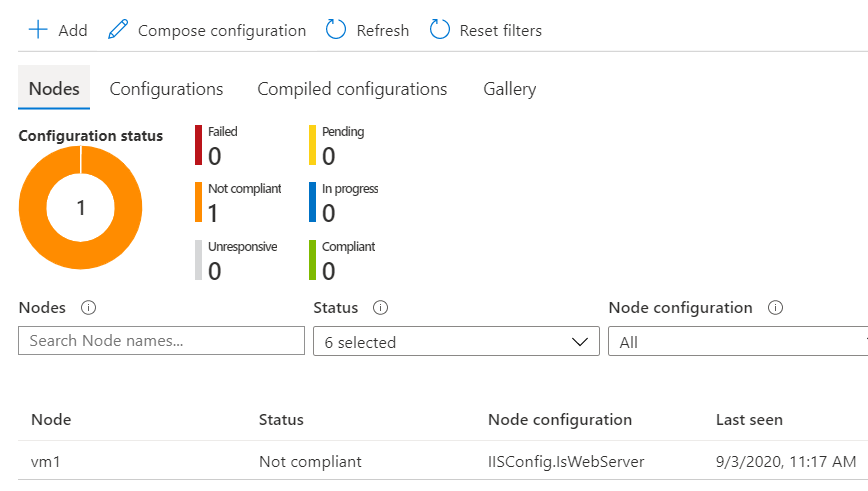
<p>Now let's go to Azure Portal, "State Configuration (DSC)" blade.</p>

<figure class="wp-block-image is-resized"><img src="/wp-content/uploads/2020/09/image-12.png" alt="" class="wp-image-147" width="608" height="344" /></figure>

<p>Your VM now appears as "Not compliant" with the assigned configuration. Remember that during node registration, we chose "ApplyAndMonitor" as the configuration mode. This means that configuration was applied only once, during the initial registration. </p>

<p>Had we opted for "ApplyAndAutoCorrect", the DSC mechanism would have reinstalled IIS, ensuring that our server always stays compliant with the configuration.</p>]]></content><author><name>Dimitris Pantazis</name></author><category term="Azure" /><category term="DSC" /><category term="PowerShell" /><summary type="html"><![CDATA[Hello and welcome to my new blog!]]></summary><media:thumbnail xmlns:media="http://search.yahoo.com/mrss/" url="https://flymetothecloud.com/wp-content/uploads/2020/09/Automation_DSC.png" /><media:content medium="image" url="https://flymetothecloud.com/wp-content/uploads/2020/09/Automation_DSC.png" xmlns:media="http://search.yahoo.com/mrss/" /></entry></feed>