Hello and welcome to my new blog!
In my first post I decided to talk about two technologies which, when combined, can give you a lot of power managing your VMs in the cloud.
First one is PowerShell. Generally, I prefer to use it for my daily tasks. I have also used it a lot in my career, in order to help organizations get rid of long, boring, GUI-driven processes and replace them with code that works every time, with the same result but, most importantly, way faster.
Second one is Microsoft Azure. I started working with Azure about two years ago and I can say that it has opened new fields for me enabling rapid and consistent deployments, helping to stay up-to-date and take advantage of the latest and coolest technologies in the IT industry.
So, this one is dedicated to Azure Automation State Configuration. It is a Configuration Management tool that can help you push declarative configurations to your servers, both in the cloud and on-premises, either Windows or Linux. It is based on PowerShell Desired State Configuration (DSC) which became available with PowerShell 4.0 in Windows Server 2012 R2. PowerShell DSC works in two modes, “push” and “pull”. In the “push” mode the administrator runs a command that “pushes” a configuration against one or more servers. In the “pull” mode, the administrator uploads all configurations in a central repository called the “pull server”. Then, each server contacts the “pull server” on specified intervals to see if there is any new configuration for him to “pull” and apply.
Azure Automation State Configuration offers you a “pull-server-as-a-service”, which means that you can upload your configurations to Azure, register your servers to the service and monitor their compliance status through a reporting tool. In order to set things up, you will need the following components:
- an Azure Automation Account
- some DSC code
- your own servers
Create an Automation Account
Creating an Automation Account is as easy as searching for “automation” in the Azure portal. Choose “Automation Accounts” then click “Create automation account”. You will need to specify a name for your automation account, a resource group and a location.

You can also create your automation account using the following Azure PowerShell cmdlet:
New-AzAutomationAccount -Name Automation1 -ResourceGroupName rg1 -Location westeuropeImport a DSC configuration
Now that you have created your Automation Account, it’s time to populate with some configurations, that is, the actual PowerShell code. Look for your newly created Automation Account “Automation1” and navigate to “State configuration (DSC) / Configurations” and then click “Add”.

Choose to upload a DSC configuration file from your hard drive and click “OK”.

There are already tons of configuration files available on the Internet. You can grab a very basic one from my Github page.
You can also import a configuration file using Azure PowerShell.
Import-AzAutomationDscConfiguration -AutomationAccountName "Automation1" -ResourceGroupName "rg1" -SourcePath ".\IISConfig.ps1" -PublishedNext step is to compile your configuration. Back in the Azure Portal, on the “Configurations” tab, choose your configuration and in the next window click “Compile”.

To achieve this with Azure PowerShell just run the following cmdlet:
Start-AzAutomationDscCompilationJob -ConfigurationName IISConfig -ResourceGroupName rg1 -AutomationAccountName Automation1Now that our code is ready, it is time to assign the configuration to our server. For this purpose I have already created an Azure VM called “vm1”.
In the “State Configuration (DSC) blade, navigate to “Nodes” and click “Add”.

Choose your VM from the list and click “Connect”.


In the last window, you can make a few choices such as:
- Node configuration name: We will choose “IISConfig.IsWebServer” which refers to the part of our PowerShell code that installs IIS on our Windows Server.
- Refresh Frequency: Refers to how often the VM checks for new configurations. Default is 30 minutes.
- Configuration Mode: You can choose how to apply the configuration to your server. We choose “ApplyAndMonitor”.
- Configuration Mode Frequency: It specifies how often the “Configuration Mode” is applied. Works only with ” ApplyAndAutoCorrect” and “ApplyAndMonitor”. Default is 15 minutes.

Apart from using Azure Portal, you can also register your VMs as DSC nodes using the following Azure PowerShell cmdlet:
Register-AzAutomationDscNode -AutomationAccountName Automation1 -AzureVMName vm1 -ResourceGroupName rg1 -NodeConfigurationName "IISConfig.IsWebServer" -ConfigurationMode ApplyAndMonitor -RefreshFrequencyMins 30 -ConfigurationModeFrequencyMins 15Once you click OK, the “Microsoft.Powershell.DSC” extension will be installed to your VM. As soon as the registration process is completed, the configuration will be applied to your server. In our case, IIS will be installed. You can confirm that by checking IIS installation status on your VM.

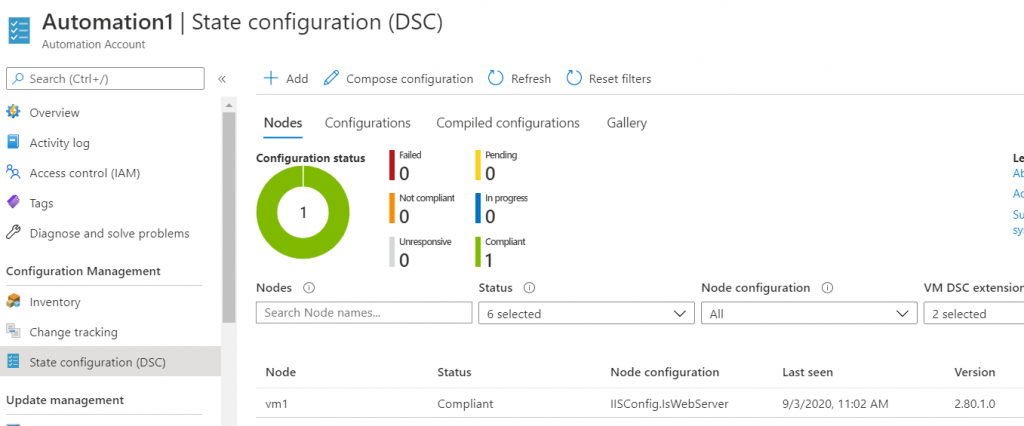
You can also use Azure Portal to ensure that your nodes are compliant with the assigned configurations.

As a last step, I will show you what happens if IIS gets uninstalled from the server. First, let’s remove the role using Windows PowerShell

Now let’s go to Azure Portal, “State Configuration (DSC)” blade.

Your VM now appears as “Not compliant” with the assigned configuration. Remember that during node registration, we chose “ApplyAndMonitor” as the configuration mode. This means that configuration was applied only once, during the initial registration.
Had we opted for “ApplyAndAutoCorrect”, the DSC mechanism would have reinstalled IIS, ensuring that our server always stays compliant with the configuration.

